
By the FaultToFix team | Published: 28 October 2026 | Last updated: 28 October 2026
DIY level: Easy · Cost: £0 for the adjustments, £5–£30 only if seals are needed · Time: 10–30 minutes per window
Quick Answer: A draughty uPVC window usually does not need new seals — it needs its locking cams adjusted. The mushroom-shaped cams on the sash edge loosen with age and use, so the sash no longer pulls tightly against the frame seal when you close the handle. A 4 mm Allen key, a quarter-turn at a time on each cam, restores the compression and stops the draught in about 10 minutes, for free. Replace seals only if they are perished, torn, or flattened beyond recovery — and check the hinges before you blame the seals at all.
Key Takeaways
- Adjustment comes before replacement: most sash-edge draughts are loose locking cams, not failed seals.
- One tool does most of it: a 4 mm Allen key fits the locking cams on most UK uPVC windows (check yours first — a few use 5 mm).
- Adjust evenly, a quarter-turn at a time: turning one cam hard while the others stay loose bends the seal line and can make the handle stiff.
- The paper-grip test tells you the truth: if a sheet of paper slides out of a closed sash easily, that spot is not compressing; if it grips, the seal there is fine.
- Seals are the last step, not the first: only replace a gasket that is perished, torn, hardened, or visibly flattened — and match its type before you buy.
Jump to a Section
- Confirm the diagnosis · Symptom → cause table · You need · Adjust the locking cams, step by step · Check the hinges · The paper-grip re-test · When seals actually need replacing · Common mistakes · When to stop and call a professional · Cost table · US / UK term box · FAQs · Checklist
Safety box
Nothing in this guide involves removing a glazing unit, breaking a sealed unit, or taking a sash or frame out — those are not DIY jobs, and a failed sealed unit is a replacement, not a repair. Do not force a handle that will not turn: a stiff handle after adjustment means you have over-tightened, not that you need more force — back the cams off. Do not lean out of an upstairs window to reach hinges; work from inside with both feet on the floor, and leave high or hard-to-reach windows to a professional. If the sash has dropped badly, a hinge is broken, or the frame is cracked or warped, stop — that is beyond adjustment, and forcing it can break the lock mechanism.
First, confirm the diagnosis (one free check)
Check — where exactly is the draught coming from? Before you adjust anything, close the window, lock the handle, and run the back of your hand slowly around the sash edge — top, lock side, hinge side, and bottom. The back of the hand is more sensitive to moving air than the palm. For a finer check, hold a thin strip of tissue paper near the edge: it flutters where air is getting in. (A candle flame is the old test, but tissue is safer near curtains and blinds.)
- Draught all around the sash edge, or strongest on the lock/handle side: the locking cams are loose — the sash is not pulling tight against the seal. This is the common case, and the cam adjustment below is written for it.
- Draught mainly on the hinge side, or the sash looks slightly out of square in the frame: the hinges (friction stays) are worn, loose, or need adjustment — check the hinge section before you touch the cams.
- Draught at one corner only, or the sash catches when you close it: the sash has dropped slightly on its hinges, or one cam is out of step with the others. Adjust evenly; do not just crank the corner cam.
- Draught from between the frame and the wall, not the sash edge: that is a perimeter sealing problem — old mastic or a gap in the frame-to-wall seal — not a cam or gasket problem, and it is a different fix.
- No draught at the edge, but the glass itself is misty between the panes: that is a failed sealed unit, not a draught at all — ventilation and cam adjustment will not fix it, and the unit needs replacing by a glazier.
That one walk-around saves most people from the expensive mistake: paying for new seals — or a whole new window — to fix a five-minute adjustment, or adjusting for months to fix a hinge or perimeter problem.
Symptom → cause table
| What you notice | Most likely cause | First check |
|---|---|---|
| Cold air all around the sash edge, handle closes easily | Loose locking cams — sash not compressing against the seal | Paper-grip test below, then cam adjustment |
| Draught strongest on the lock/handle side | Cams on the lock side out of adjustment — uneven compression | Check each cam position; adjust evenly |
| Draught on the hinge side, sash looks slightly crooked | Worn or loose hinges (friction stays) — sash not sitting square | Hinge screws tight? Sash square in the frame? |
| Sash catches or rubs at one corner when closing | Dropped sash or one cam out of step | Corner gap even all round? Adjust evenly, not one corner only |
| Handle stiff or hard to turn after adjustment | Over-tightened cams — too much compression | Back every cam off a quarter-turn and re-test |
| Draught from between frame and wall, not the sash | Perimeter seal / mastic failure — frame-to-wall gap | Look for cracked or missing mastic around the outside frame |
| Paper grips everywhere but the room still feels cold | Not a sash draught — check trickle vents, the room’s heating, or the wall itself | Vents open? Radiator on? Cold wall, not a window fault |
| Misty glass you cannot wipe, between the panes | Failed sealed unit — moisture trapped inside the glazing | Replacement unit by a glazier, not adjustment |
You need
- 4 mm Allen key — fits the locking cams on most UK uPVC windows. A small set (£5–£10) covers you if yours takes 5 mm instead; check one cam before you start.
- Phillips screwdriver — for hinge and keep screws if any are loose.
- Silicone spray or PTFE lubricant — a light spray on cams and hinges after adjustment. Do not use oil-based sprays on rubber seals; they can degrade the gasket over time.
- Soft cloth — to wipe the seal and frame before you test, so grit does not fake a gap.
- A sheet of thin paper — for the paper-grip test (ordinary printer paper is fine).
- A pencil or marker — to mark each cam’s starting position before you turn it, so you can always go back.
- Replacement gasket, only if needed — do not buy seals before diagnosing. If you do need them, take a short sample of the old gasket to match its type (see the seals section).
Adjust the locking cams, step by step
Open the window and look at the edge of the sash (the opening part) on the lock side. You will see a row of small mushroom-shaped or roller-shaped metal cams — usually two to four, depending on the window size. When you close the handle, these cams roll behind metal keeps on the frame and pull the sash tight. When they loosen, the pull weakens and air gets in.
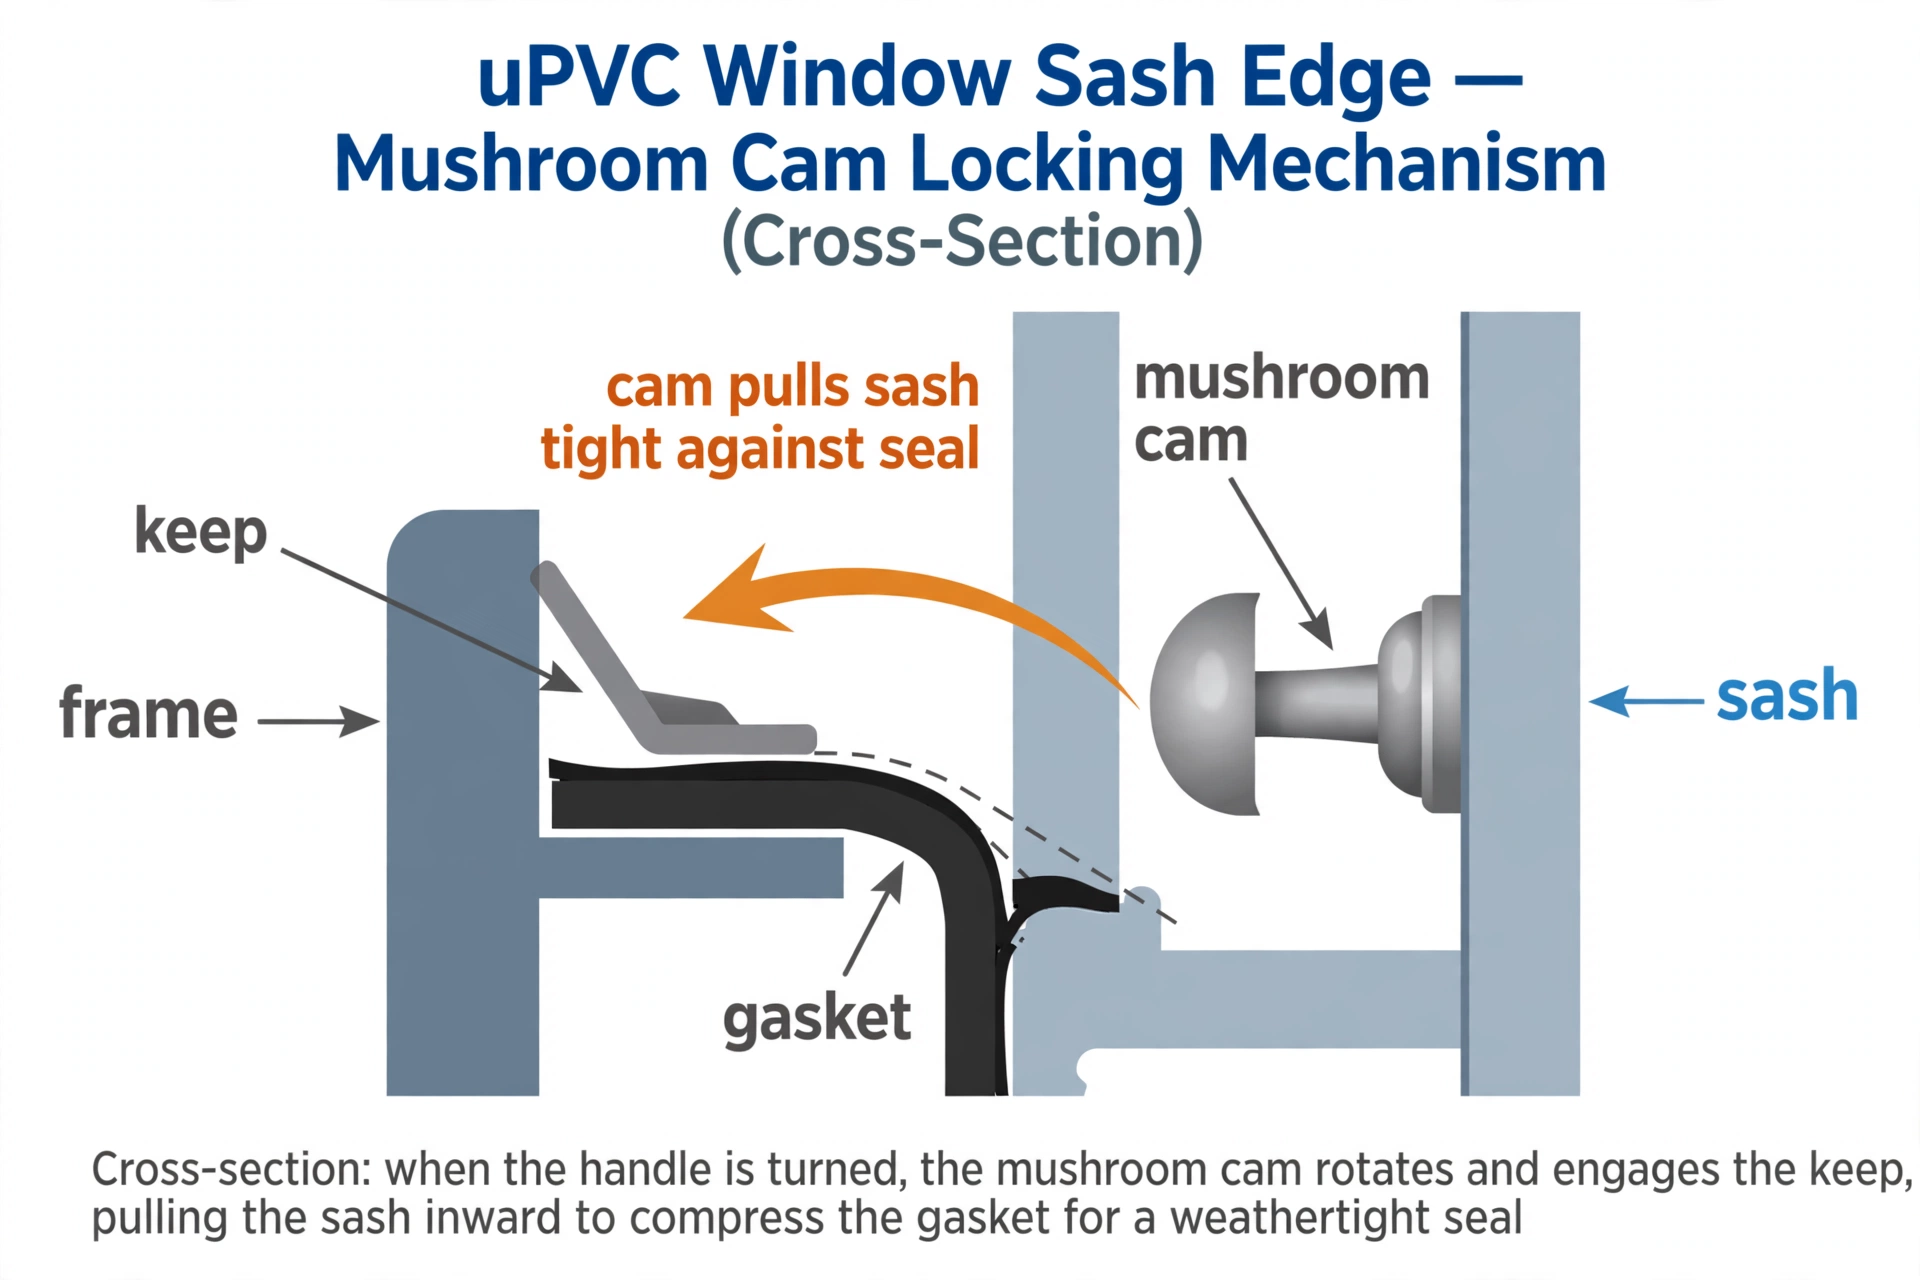
- Mark every cam’s starting position. With the window open, put a small pencil mark on each cam and the sash next to it. This is your way back if anything goes wrong — and it shows you at a glance which cams you have already moved.
- Do the paper-grip baseline first. Close and lock the window with a sheet of paper trapped at several points around the sash edge, and try to pull it out at each point. Note where it slides out easily (no compression) and where it grips (seal fine). Those easy-slide spots are the cams to adjust.
- Turn one cam a quarter-turn. Fit the Allen key into the cam’s socket and turn it a quarter-turn. Which way tightens depends on the cam design — on most mushroom cams, turning so the raised side faces further into the keep increases compression — so turn a quarter, close the window, and re-test with the paper at that spot. If the grip improves, you turned the right way; if it gets worse, turn it back half a turn (past the mark) and test again. Never guess with a full turn.
- Work around the sash evenly. Adjust each loose cam by the same small amount, in turn, rather than cranking one cam all the way. Even compression is what seals a window; one tight cam and three loose ones just moves the gap.
- Test the handle after every round. The handle should close firmly but without a fight. If it gets stiff or will not fully lock, you have gone too far — back every cam you moved off by a quarter-turn and test again. A handle that needs forcing will wear the mechanism out.
- Lubricate lightly when you are done. A short spray of silicone or PTFE lubricant on the cams and keeps, worked in by opening and closing the handle a few times, keeps the adjustment smooth through the winter. Wipe off any excess so it does not collect grit.
Check the hinges
If the draught is mainly on the hinge side, or the sash does not sit square in the frame, the hinges — called friction stays — are the problem, not the cams. Open the window and look at the top and bottom hinges.
- Loose screws first: check every visible hinge screw is tight. A screw that keeps working loose, or one that spins without gripping, means the fixing is worn — do not just keep tightening it; that hinge needs professional attention.
- Flag-hinge adjustment, small turns only: many modern hinges have small adjustment screws for lateral (side-to-side) and height movement. If yours do, turn them a quarter-turn at a time, checking the sash gap stays even all round after each turn. If you are not sure which screw does what, leave it — a wrongly adjusted hinge can drop the sash.
- Stiff or gritty hinges: clean off grit with the soft cloth and apply the same light silicone or PTFE spray, then open and close the sash a few times to work it in. Do not oil hinges with thick grease; it attracts dirt.
- Sash still out of square after hinge checks: stop. A sash that has dropped significantly, or a hinge that is bent or broken, is a professional repair — adjusting cams will not square it, and forcing the handle can break the lock.
The paper-grip re-test
When you think you are done, repeat the baseline test properly: close and lock the window, trap the paper at the top, bottom, lock side, and hinge side, and pull at each point. You want a firm grip everywhere — the paper should drag or tear rather than slide out freely. Then run the back of your hand around the edge once more on a windy day if you can; still air on a calm day can flatter a weak seal. If one spot still slides, adjust only that area’s cam by another quarter-turn and test again. If every spot grips and the handle closes smoothly, the job is done — do not keep tightening for luck.
When seals actually need replacing
Replace a gasket only when adjustment and hinge checks have not fixed the draught and the seal itself is visibly finished. Signs it is finished: the rubber is perished and crumbling, torn or split, hardened and shiny instead of soft and matt, or permanently flattened so it no longer springs back when you press it. A seal that is dirty or slightly compressed is not finished — clean it and adjust first.
- Identify the type before you buy. uPVC windows use several gasket profiles — bubble, flipper, and wedge are the common ones — and they are not interchangeable. Cut a short sample (about 5 cm) from a corner of the old gasket and take it, or a clear photo of its cross-section, to the supplier. Measure nothing from memory: the profile is what matters, not the window brand.
- Fit push-in gaskets dry. Most sash gaskets push into a groove by hand or with a blunt tool — no glue, no sealant. Start at a corner, work the gasket into the groove evenly, and cut it to length at the final corner with a small overlap trimmed flush. Do not stretch it as you fit it; stretched gasket shrinks back and leaves a gap at the joint.
- Test again after fitting. Do the paper-grip test all round before you call it done. A new gasket with loose cams still draughts — so if you replaced seals, re-check the cam adjustment too.
- Approximate cost: a length of replacement gasket is typically £5–£15 per window when fitted DIY. If a supplier quotes a full window to fix a gasket, get a second opinion.
Common mistakes
- Replacing seals before adjusting. The most expensive mistake in this guide: new gaskets on loose cams still leak, and you have paid for nothing.
- Cranking one cam all the way. Uneven compression moves the gap instead of closing it, and can bow the sash or strain the handle.
- Over-tightening until the handle fights back. A stiff handle is not a tighter seal — it is a worn mechanism in the making. Back off a quarter-turn.
- Using oil-based spray on rubber seals. Oil can degrade gaskets over time. Silicone or PTFE spray only, and wipe off the excess.
- Adjusting hinges without checking cams first. Hinge adjustment is fiddlier and riskier; most draughts are cams, so rule those out first.
- Stretching a new gasket during fitting. It shrinks back and leaves a gap at the corner joint — feed it in without pulling.
- Ignoring the frame-to-wall gap. If the draught comes from around the frame, no amount of sash work will fix it; that is a perimeter-seal job.
When to stop and call a professional
Stop and get professional advice if: the sash has dropped badly or will not sit square after hinge checks; a hinge is bent, broken, or its screws spin without gripping; the lock mechanism is broken or the handle will not turn even with cams backed off; the frame is cracked, warped, or the frame-to-wall gap is large; or the sealed unit has failed (mist between the panes). Renters should raise persistent draughts from a damaged frame or failed unit with their landlord in writing rather than trying to fix a structural cause themselves. A professional adjustment visit is typically far cheaper than a replacement window — ask for adjustment and gasket work first, not a new window, unless the frame itself has failed.
Cost table (UK, typical)
| Item | Typical cost |
|---|---|
| Cam and hinge adjustment (DIY) | £0 |
| Allen key set (4 mm and 5 mm) | £5–£10 |
| Silicone or PTFE lubricant spray | £5–£8 |
| Replacement gasket, per window (DIY) | £5–£15 |
| Professional adjustment / gasket visit | £50–£100 call-out, typical |
| Replacement sealed glazing unit (glazier) | £100–£300+ per unit, size and type dependent |
| Replacement window frame (only when the frame itself has failed) | £300–£800+ per window |
US / UK term box
| US term | UK term used in this guide |
|---|---|
| Hex key | Allen key |
| Vinyl window | uPVC window |
| Draft | Draught |
| Window sash | Sash (same) |
| Hinge / friction hinge | Friction stay |
| Locking cam / roller cam | Mushroom cam / locking cam |
| Striker plate | Keep |
| Weatherstrip / weatherstripping | Gasket / draught seal |
| Slot vent | Trickle vent |
| Glazier | Glazier (same) |
FAQs
Will adjusting the cams fix every draughty uPVC window?
No — it fixes the common case, which is loose cams letting the sash sit slack against the seal. It will not fix a dropped sash, a broken hinge, a frame-to-wall gap, or a failed sealed unit. That is why the diagnosis section comes first: find where the air is coming from, then fix that thing.
Which way do I turn the cam to tighten it?
It depends on the cam design, so do not guess with a full turn. Mark the starting position, turn a quarter-turn, close the window, and do the paper-grip test at that spot. If the grip improves, you turned the right way; if it gets worse, turn it back past the mark by half a turn. A quarter-turn test costs nothing and cannot damage anything.
Why is the handle stiff after I adjusted the cams?
You have over-tightened. Back every cam you moved off by a quarter-turn and test the handle again after each round. The handle should close firmly but smoothly — forcing a stiff handle wears the lock mechanism and can snap it.
Do I need new seals, or just an adjustment?
Adjustment first, always. Only replace a seal that is perished, torn, hardened, or permanently flattened — and match its profile with a sample before buying. A dirty or slightly compressed seal is not a failed seal; clean it, adjust the cams, and re-test.
My window will not close properly — the sash seems to have dropped. Can I adjust it?
Check the hinge screws and, if your hinges have adjustment screws, try a quarter-turn at a time while watching the sash gap. If the sash is badly dropped, a hinge is broken, or screws spin without gripping, stop — that is a professional hinge repair, and forcing the handle can break the lock.
How often should I check my window cams?
Once a year, at the start of autumn before the cold winds arrive, is enough for most windows — plus a quick paper-grip test any time a draught appears. A drop of silicone or PTFE lubricant on the cams at the same visit keeps them moving freely.
Checklist
- [ ] Draught located — sash edge, hinge side, corner, or frame-to-wall
- [ ] Paper-grip baseline done before adjusting
- [ ] Every cam’s starting position marked
- [ ] Cams adjusted a quarter-turn at a time, evenly around the sash
- [ ] Handle closes firmly but smoothly, not stiff
- [ ] Hinges checked — screws tight, sash square, lightly lubricated
- [ ] Paper-grip re-test firm all round the sash
- [ ] Seals replaced only if perished, torn, hardened, or flattened — profile matched by sample
- [ ] Dropped sash, broken hinge, cracked frame, or failed unit referred to a professional