By the FaultToFix team | Published: 26 October 2026 | Last updated: 26 October 2026
DIY level: Easy to diagnose · Moderate to flush one radiator · Cost: £0 to check · ~£15–£20 inhibitor · £350–£600 professional powerflush · Time: 10 minutes to diagnose · ~1 hour to flush one radiator
Quick Answer: A radiator hot at the top and cold at the bottom is almost never an air problem — air rises, so air makes the top cold. A cold bottom means sludge (black magnetite rust from inside the system) has settled in the base, and hot water flows over it. Bleed a little water out: black or gritty water confirms sludge. One radiator means a DIY hose-flush (about an hour); several radiators means a professional clean of the whole system.
Key Takeaways
- Cold bottom ≠ air. Air collects at the top; a cold bottom points to sludge.
- The bleed-water test confirms it in 5 minutes: black, inky or gritty water = sludge.
- Bleeding alone never fixes a cold bottom — it removes nothing from the base.
- Count the lockshield turns before closing it — reopening by the same number keeps the system balanced.
- Inhibitor after flushing, plus a magnetic filter, stops the sludge coming back.
Jump to a Section
Confirm the diagnosis · What you need · The fix, step by step · If several radiators are cold · Stop the sludge coming back · Common mistakes · When to call a pro · Cost table · US / UK term box · FAQs · Checklist
Safety box
Radiator water scalds — let the system cool for at least an hour before removing a radiator, with towels and a tray under every joint you open. Nothing here involves opening a boiler casing or touching gas parts — never do either; gas work is Gas Safe (UK) / licensed technician (US) only. A water-filled radiator is very heavy — always lift with two people, never attempt a large or cast-iron radiator alone. If a valve joint weeps faster after you move it, or a valve will not shut off, stop and call a heating engineer before disconnecting anything.
First, confirm the diagnosis (the cold-pattern checks)
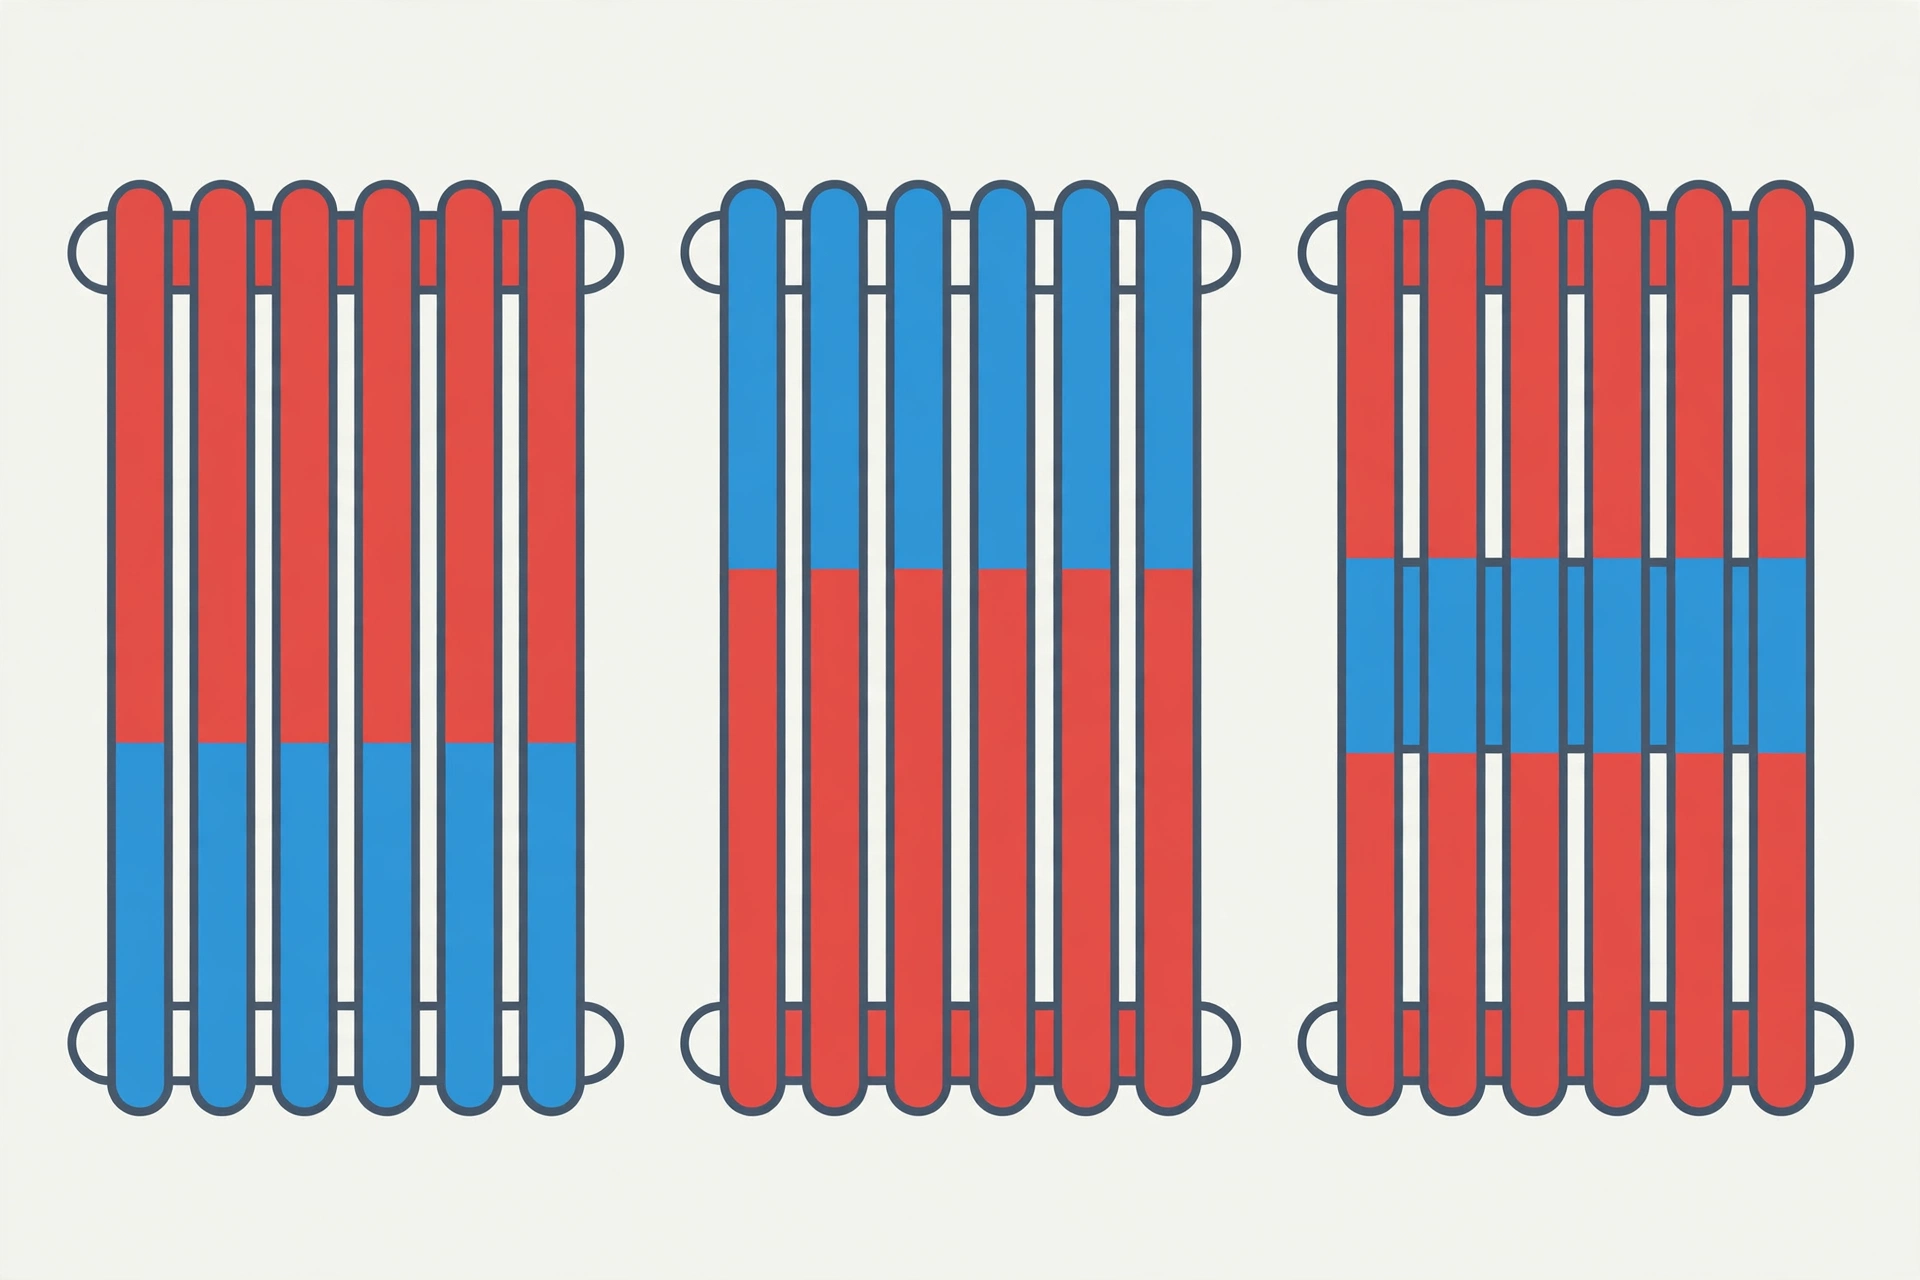
Where the cold patch sits tells you the cause. Feel the radiator carefully after the heating has run for 20 minutes, then check this table before touching any tools:
| Where it is cold | What it means | The fix |
|---|---|---|
| Cold at the bottom, hot at the top | Sludge in the base — hot water flows over it | This article: bleed-water test, then flush |
| Cold at the top, hot at the bottom | Trapped air — air rises to the top | Bleed the radiator; if pressure drops too, see Boiler Pressure Keeps Dropping |
| Cold in the middle / centre slab | Sludge banked in the middle channels | Same as cold-at-bottom, this article |
| Whole radiator cold, pipes cold too | No flow — closed valve or stuck TRV pin | Check both valves; see Stuck TRV Pin |
| This radiator lukewarm, others roasting | Balancing — nearer radiators take the flow | See One Room Always Cold (balancing fix) |
The bleed-water test (5 minutes — the check that confirms sludge). Turn the heating off. Put a tray and cloth under the bleed screw at the top corner, open it half a turn with a bleed key, let a cupful of water into a clear container, then close it.
- Clear or slightly brown water → sludge is unlikely to be the whole story; re-check the table.
- Black, inky or gritty water → sludge confirmed. That black is magnetite — fine iron rust circulated and settled for years. Bleeding alone will never fix a cold bottom: you only let air/water out of the top, while the sludge in the base stays put.
Note the boiler pressure after bleeding: bleeding lowers it. Below about 1 bar cold, top it up via the filling loop as your boiler manual describes — and if pressure keeps dropping over the following days, work through the Boiler Pressure Keeps Dropping checklist instead of topping up forever.
You need
- Radiator bleed key — standard square type, ~£1–£3.
- Towels, a shallow tray and a bucket — radiator water stains carpets permanently (black sludge water especially).
- Adjustable spanner and grips — for the union nuts joining radiator to valves.
- A hosepipe on an outside tap — for flushing the radiator in the garden, on grass or a drain, never on a pale patio you care about.
- PTFE tape — ~£1 a roll, for a union that weeps on refitting.
- Central heating inhibitor — ~£15–£20 a bottle (e.g. Fernox F1 / Sentinel X100 class), dosed after flushing. Check the bottle dose per radiator count.
- A second person — for lifting the radiator off its brackets. Non-negotiable above a small single panel.
The fix, step by step — flush the one radiator
Work in this order. Do not skip to removing the radiator until the free checks are done.
Step 0 — the free checks (5 minutes). Both bottom-corner valves must be open: the thermostatic radiator valve (TRV) head at 3 or higher, and the lockshield (the plain cap on the other side) at least partly open. A half-closed lockshield can mimic a cold bottom by starving flow. If both are open and the bottom is still cold with black bleed water, proceed.
- Heating off, radiator cool for at least an hour.
- Count the lockshield turns — write this number down. Close the lockshield valve (under its plastic cap), counting exactly how many turns it takes to shut. Reopen it by the same number afterwards to restore the system’s balancing — the small detail most guides skip and most DIYers regret.
- Close the TRV end too (head to 0 / the frost symbol, or remove the head and fit the decorator’s cap).
- Drain the radiator. Tray underneath, towels down. Open the bleed screw first to let air in, then loosen the union nut between radiator and one valve just enough to drain into the tray in a controlled way. Expect several litres of filthy water. Work one end, then the other, until the flow stops.
- Disconnect and lift off. Fully undo both union nuts, lift the radiator off its brackets with your helper, tilt it slowly over the tray to empty the last water — sludge water will keep coming. Carry it upright outside.
- Hose-flush it. Connect the hosepipe to one bottom inlet. Run water through, rocking the radiator gently side to side; black water and grit will pour from the other inlet. Swap ends and repeat. Keep going — turning it upside down and flushing again helps — until the water runs completely clear from both ends. Usually 5–10 minutes. What comes out is the sludge that made the bottom cold.
- Refit. Hang the radiator back on its brackets, reconnect both union nuts (fresh PTFE tape on a weeping thread if needed), tighten firmly but not brutally.
- Reopen the valves — lockshield first, by your counted turns, then the TRV end / refit the TRV head.
- Bleed the radiator until a steady stream of water — no air hissing — comes from the bleed screw, then close it.
- Top up the boiler pressure at the filling loop to about 1–1.5 bar cold (check your boiler manual), then turn the heating on.
Test it worked: after 20 minutes of heating, the radiator should be evenly hot top to bottom, with no cold slab at the base. Run your hand (carefully) across the bottom edge — even warmth is a pass; a remaining cold strip means heavy sludge is still packed in and a second flush, or a professional clean, is the honest next step.
If several radiators are cold at the bottom
One sludged radiator is a DIY flush. Three or more radiators cold at the bottom, black water in every radiator you test, or a boiler that rumbles/kettles means system-wide sludge — flushing radiators one by one will take all weekend and still leave the pipework dirty. That is powerflush territory: a heating engineer connects a flushing machine and chemicals to the whole system for most of a day, typically £350–£600 for an average house, depending on radiator count. Get two quotes, and ask whether the price includes inhibitor and a magnetic filter.
Stop the sludge coming back
- Dose inhibitor after any flush or drain-down (follow the bottle dose; usually added via a radiator or the filling loop). Inhibitor slows the corrosion that creates magnetite. Refresh it every few years; most systems have never had it done once.
- Fit a magnetic filter on the return pipe near the boiler (e.g. MagnaClean / SpiroTech class, ~£80–£120 for the unit; often fitted at the same visit as a powerflush). It traps magnetite continuously before it can settle in a radiator — the single most effective anti-sludge measure.
- Do not just keep bleeding. Frequent bleeding lets fresh, oxygen-rich water in, which accelerates the corrosion that makes sludge.
Common mistakes
- Bleeding instead of flushing. Bleeding only lets air and water out of the top. A cold bottom is sludge in the base — bleeding removes none of it, so the bottom stays cold no matter how often you bleed.
- Skipping the counted lockshield turns. Close the lockshield without counting and you lose the system’s balancing on reopening — a different radiator can go lukewarm next. Count, write it down, reopen by exactly that number.
- Forgetting the inhibitor. A flush without inhibitor leaves clean metal and fresh water to corrode all over again. Dose inhibitor after every flush or drain-down, or the same radiator can re-sludge within 2–3 heating seasons.
- Using these steps on a steam radiator. This article covers sealed hot-water radiators only. A steam radiator cold at one end is a different fault — usually a failed air vent or a pitch problem — and bleeding and hose-flushing do not apply.
- Opening the boiler casing or touching gas parts. Never do either. Gas work is Gas Safe (UK) / licensed technician (US) only — this article deliberately stays outside the boiler.
When to stop and call a pro
- A valve will not close, or a joint leaks faster once disturbed — water damage costs more than a call-out.
- The radiator is a large double-panel or cast-iron unit you cannot lift safely with two people.
- Several radiators are affected, or the boiler is kettling/banging — system-wide sludge (above).
- Boiler pressure will not stay up after refilling — a different fault; see the Boiler Pressure Keeps Dropping checklist, and if it persists, a Gas Safe engineer.
- Any smell of gas, at any point: stop, and call the gas emergency line (UK: 0800 111 999) — not a plumber, the emergency line.
Cost table
| Fix | Who does it | Typical cost |
|---|---|---|
| Bleed-water test (diagnosis) | DIY | £0 |
| Bleed key + PTFE tape | DIY | ~£1–£3 each |
| Inhibitor, one bottle | DIY after flushing | ~£15–£20 |
| Single-radiator flush | DIY (two people) | £0 beyond tools above |
| Magnetic filter unit | Heating engineer | ~£80–£120 for the unit |
| Full-system powerflush | Heating engineer | £350–£600 |
US / UK term box
Reading from the other side of the Atlantic?
- TRV = thermostatic radiator valve — the numbered dial head on the radiator (common in the UK; most US hot-water radiators use a manual valve or a different-style thermostatic valve).
- Lockshield = the plain, capped valve at the other end, used for balancing (US: the return-side shut-off valve).
- Bleed key / bleeding = venting air with a small square key (US: opening the air vent / bleeder valve).
- Inhibitor = corrosion-inhibitor treatment dosed into the boiler water (US: boiler water treatment).
- US readers: this article covers sealed hot-water radiators. A steam radiator cold at one end is a different fault — usually a failed air vent or a pitch problem — and these steps do not apply.
FAQs
Will bleeding the radiator fix a cold bottom?
No. Air rises, so trapped air only ever makes the top cold. A cold bottom is settled sludge, and bleeding removes nothing from the base — the fix is flushing, as above. Bleed after flushing, not instead of it.
How much does it cost to fix professionally?
A single-radiator flush as part of a visit is usually folded into a call-out plus an hour or two of labour. A full-system powerflush is typically £350–£600 including chemicals and inhibitor. Quotes well above that should come with a magnetic filter included — ask.
Can I use a chemical cleaner instead of removing the radiator?
System cleaner chemicals (left circulating for 1–4 weeks, then drained) loosen light sludge and suit a mildly affected system. They rarely clear a radiator whose bottom is stone cold — that sludge is packed, not loose. If the bleed water is black and gritty, physical flushing is the fix that works.
Why is only the bottom cold, and only on one radiator?
Sludge settles at the lowest, slowest point of flow. The radiator furthest from the boiler, or the one with the gentlest flow, collects it first — which is why one bad radiator is common years before the rest show symptoms, and why that radiator is your early warning for the whole system.
How often will I need to do this?
With inhibitor in the system and ideally a magnetic filter fitted, a flushed radiator should stay clear for years. Without them, the same radiator can re-sludge within 2–3 heating seasons — the flush is the cure, the inhibitor is what stops the disease.
Checklist
- Diagnose: heating on 20 minutes, feel where the cold patch sits, check the cold-pattern table
- Test: bleed-water test into a clear container — black or gritty water confirms sludge
- Free checks: both valves open (TRV at 3+, lockshield at least partly open)
- Cool down: heating off, radiator cool for at least an hour, towels and tray down
- Count and close: count the lockshield turns, write the number down, close both valves
- Drain and lift: drain into the tray, undo both union nuts, lift off with a helper
- Flush: hose-flush both ends until the water runs completely clear
- Refit: hang, reconnect, reopen the lockshield by your counted turns, then the TRV
- Bleed and top up: bleed until a steady stream, top up pressure to 1–1.5 bar cold
- Test again: after 20 minutes of heating, evenly hot top to bottom
Related guides
- Heating pillar: /heating/
- One Room Always Cold — balancing fix, when one room lags the rest
- Stuck TRV Pin — when the whole radiator is cold and the valve is the cause
- Boiler Pressure Keeps Dropping — pressure that will not stay up after bleeding or refilling
- Radiator Gurgling — noises and air in the system, the next heating symptom
Sources line: bleed/flush procedure cross-checked against radiator manufacturer guidance and heating-engineer practice; inhibitor/filter classes named generically (Fernox/Sentinel, MagnaClean/SpiroTech) as examples, not endorsements.